
Cartonization in techSHIP automatically determines how eligible Items can be arranged into Packages using your available Boxes, while considering physical fit, Box configuration, and applicable Handling Group compatibility rules.
This guide explains how Cartonization works, how Handling Groups affect packing, how Handling Group assignments are resolved, how Cartonization exceptions interact with those rules, and how you can configure, run, review, and troubleshoot the process.
Prefer listening? You can download the podcast-style audio attached to this article, which walks you through the key points.
 | AI-Assisted & Human-Reviewed: For general information only. Please double-check important details. | |
| Cartonization availability depends on your subscription. For additional information, refer to techSHIP Specifications Sheet [Information]. | |
| | ||
TABLE OF CONTENTS
- Understand How Cartonization Works
- Understand Handling Group Compatibility
- Determine Which Handling Group Applies
- Understand Cartonization Exceptions
- Understand Handling Group Lifecycle and Imports
- Follow the Recommended Setup Sequence
- Configure Default Cartonization for a Client
- Configure Cartonization for an Individual Import
- Configure the Cartonization Packing Slip
- Run Cartonization and Review Results
Understand How Cartonization Works
Cartonization evaluates your Items against the available Boxes to determine an appropriate packing result.
The main physical packing criteria include:
- Dimensions: Your Items must physically fit within the selected Box.
- Max Weight: The combined packed weight must remain within the Box's supported maximum weight.
- Min Allocation: The packed Items must satisfy the Box's configured minimum utilization requirement.
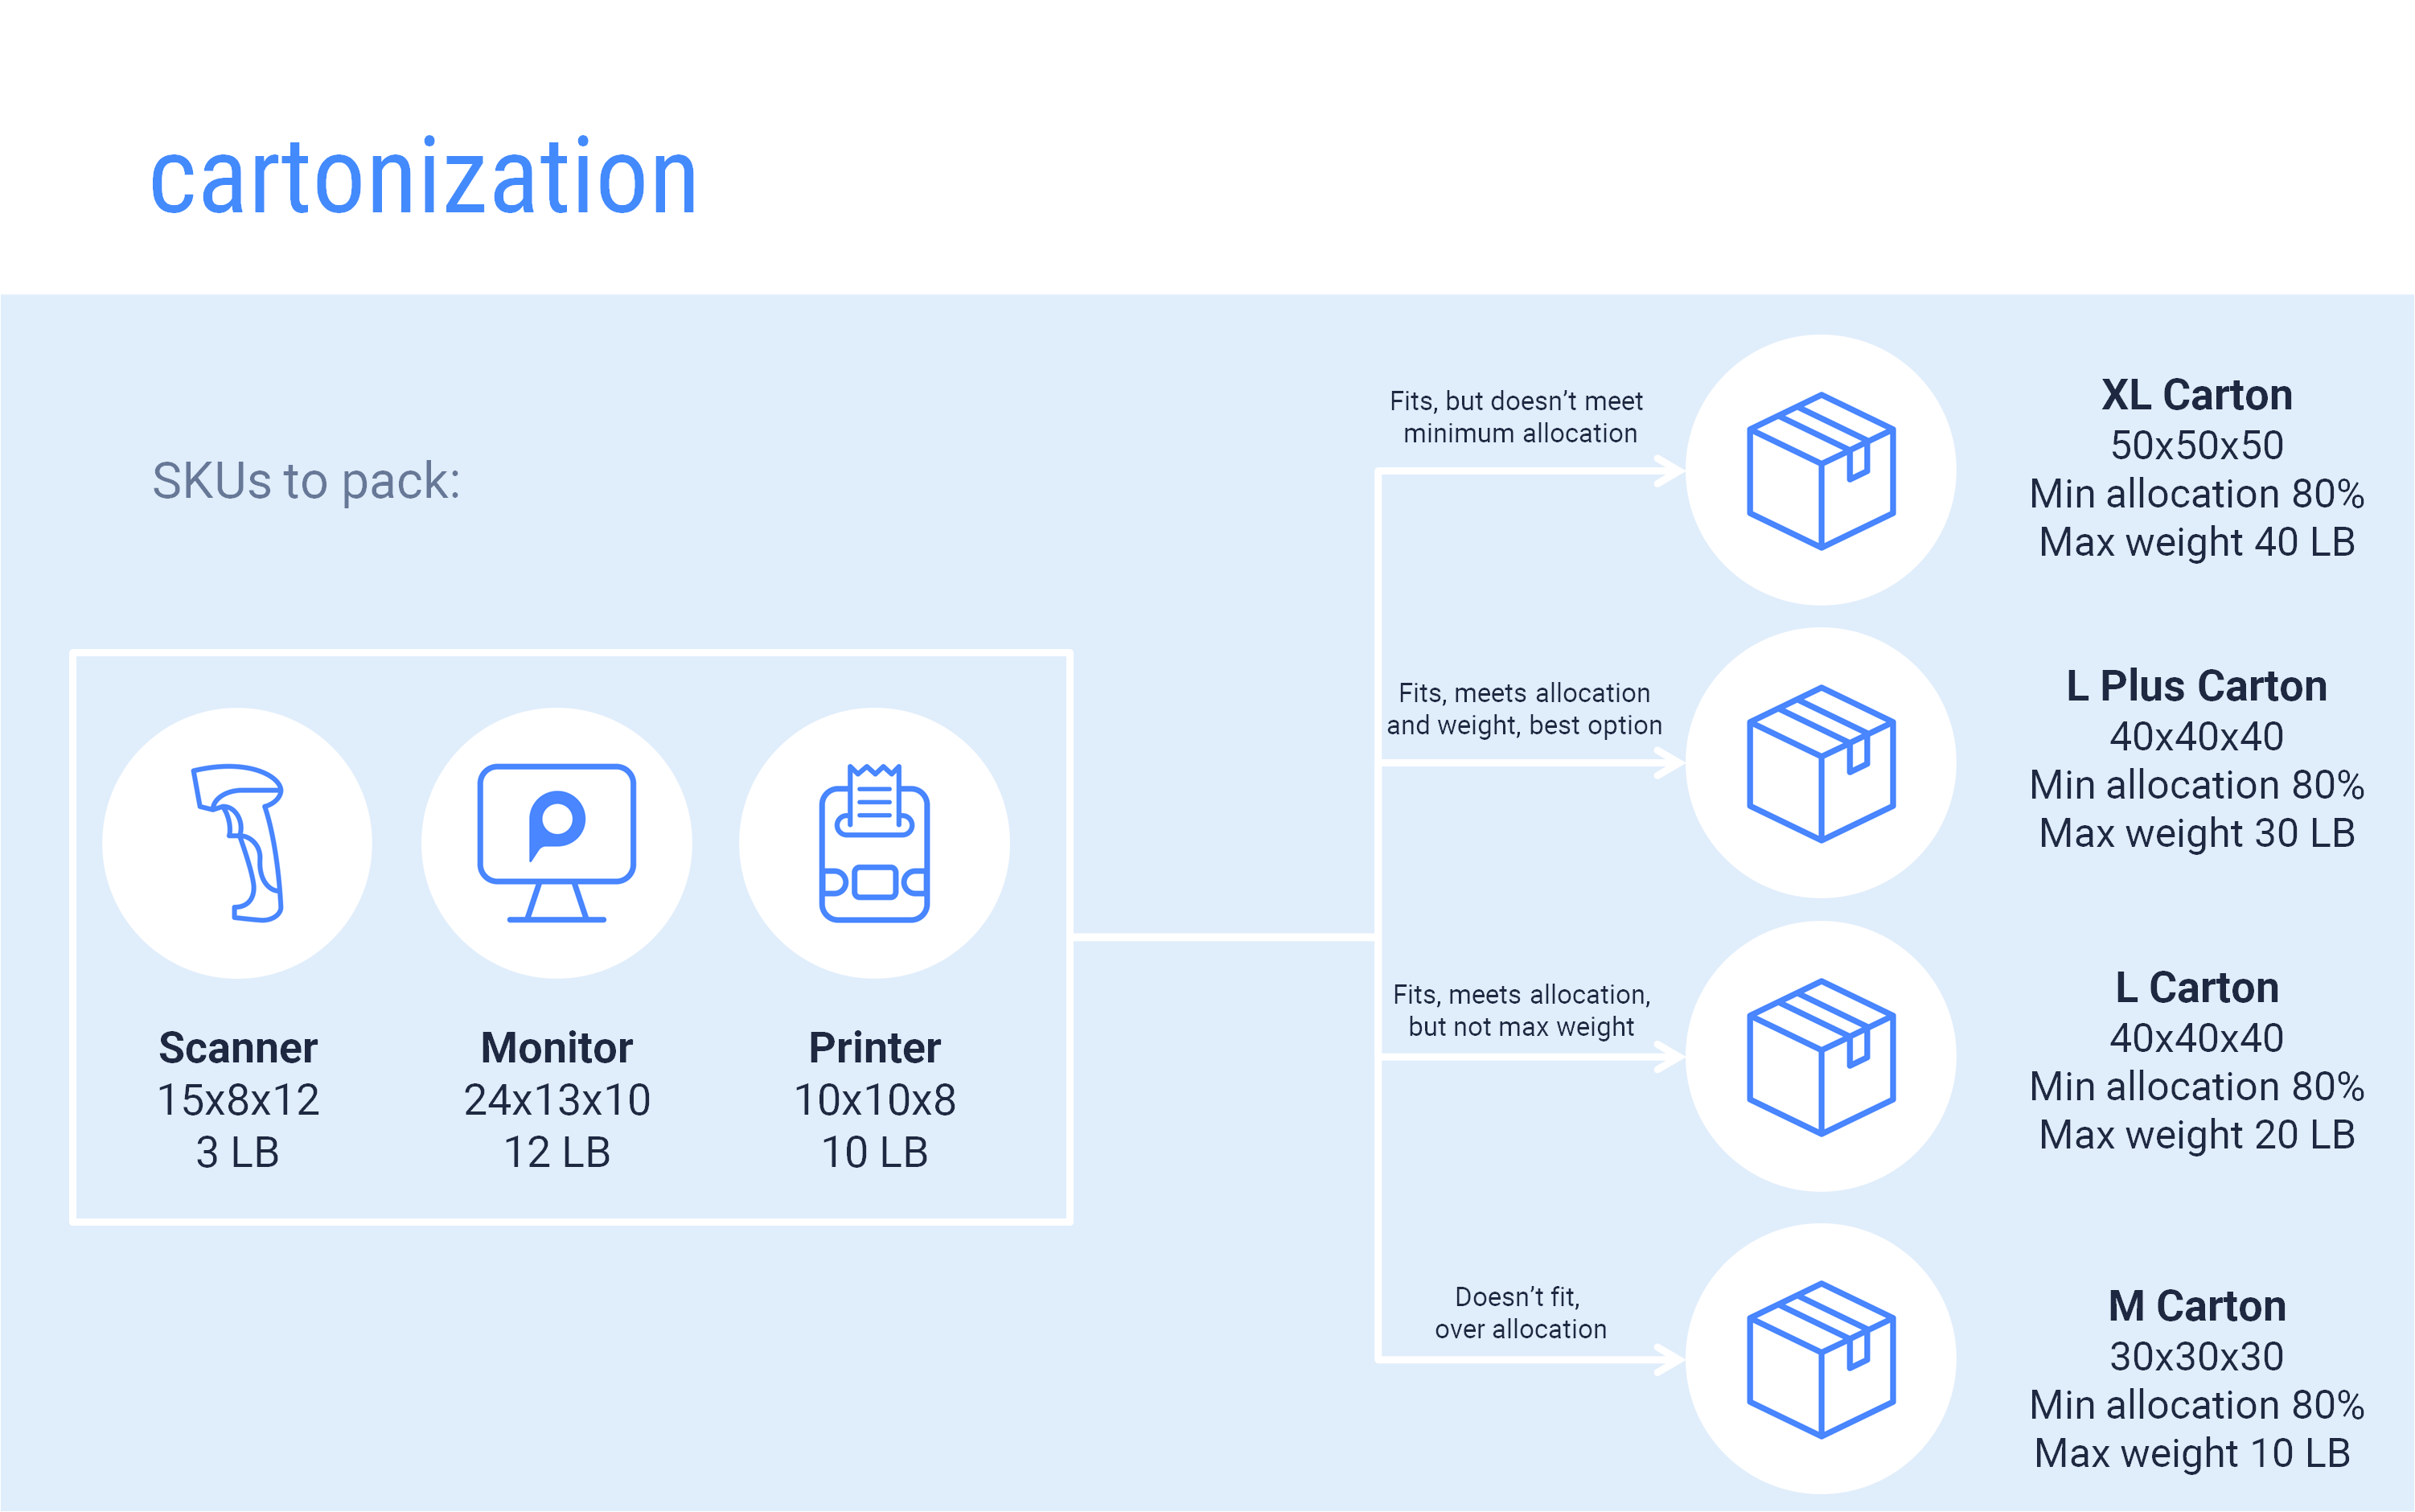
The infographic above illustrates the baseline physical Box-selection process. A Box may physically fit your Items but still be rejected because it does not meet the minimum allocation requirement or cannot support the combined weight.
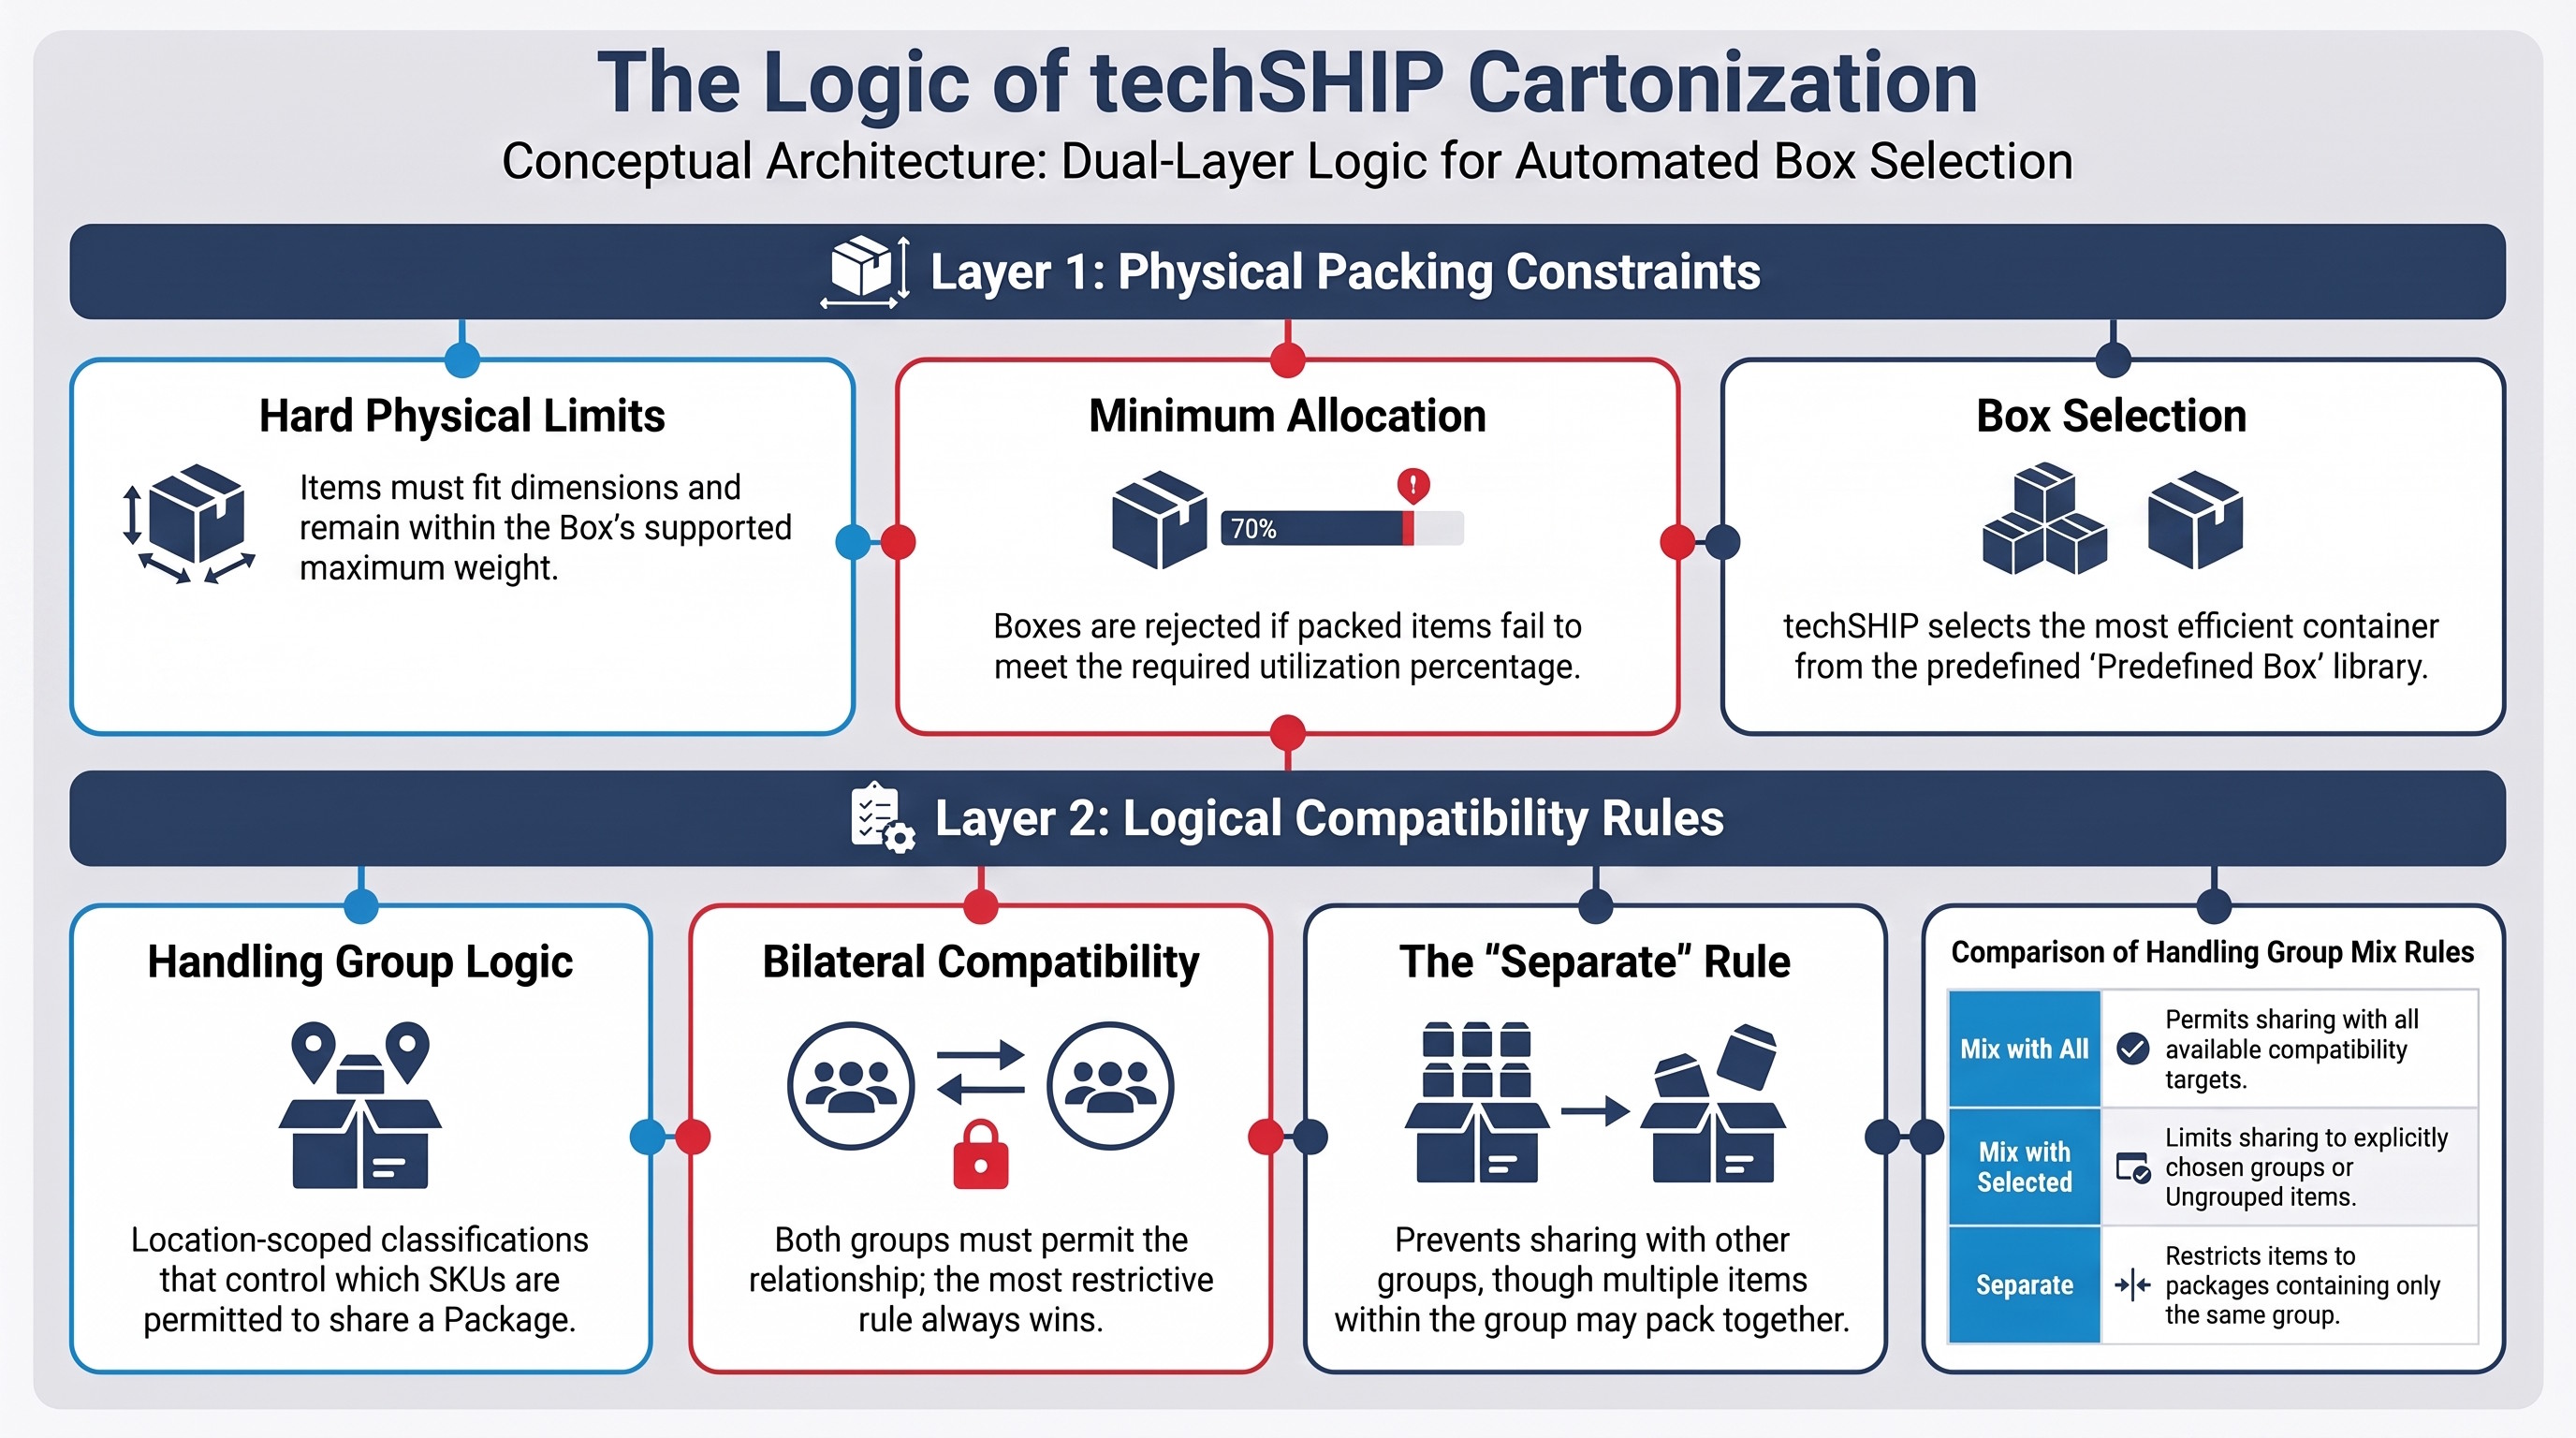
Expanded Cartonization adds Handling Group compatibility as another packing constraint. Before techSHIP optimizes Box selection, it determines which Items are allowed to share a Package.
The main Cartonization elements are:
- A Box is a predefined container that techSHIP can select during Cartonization. Its dimensions, supported weight, minimum utilization, and applicable restrictions affect whether it can be used.
- An Item represents the SKU you are packing. Its dimensions, weight, quantity, and Cartonization-related settings affect how it can be processed.
- A Handling Group is a location-scoped classification that controls which Items may share the same Package. An Item or order line can have one Handling Group or no Handling Group assignment.
- A Package contains the Items packed together into a selected Box. Items from different Handling Groups can share a Package only when their effective compatibility permits it.
Handling Group compatibility does not replace physical packing rules. Compatible Items can still require multiple Packages because of their dimensions, weight, available Boxes, Box restrictions, or the selected Cartonization algorithm.
Understand Handling Group Compatibility
Each configured Handling Group has a Mix Rule that determines how it can share Packages with other Handling Groups.
The Mix Rule selector provides the following options:
MIX RULE | BEHAVIOR |
Mix with all | Allows the Handling Group to mix with all available compatibility targets. When another configured Handling Group is involved, that group must also permit the relationship. |
Mix with selected | Allows the Handling Group to mix only with the Handling Groups or Ungrouped entry you explicitly select. |
Separate | Prevents the Handling Group from sharing a Package with any other Handling Group or with Ungrouped Items. Items assigned to the same Separate group can still share a Package when they physically fit. |
| Ungrouped is not a Mix Rule. You do not select Ungrouped from the Mix Rule field and you do not create it as a Handling Group. | |
| | ||
Understand Ungrouped
Ungrouped represents an Item or order line with no Handling Group assignment. It is a valid state and does not indicate a configuration error.
For compatibility purposes, techSHIP treats Ungrouped Items as their own packing category. Multiple Ungrouped Items can share a Package normally when the physical packing requirements allow it.
When you configure a Handling Group as Mix with selected, Ungrouped appears in the selection list alongside the other eligible Handling Groups. Select it when you want that Handling Group to be allowed to share a Package with Items that have no Handling Group assignment.
Because Ungrouped does not have its own Mix Rule, you do not configure a reciprocal rule for it. Compatibility between a configured Handling Group and Ungrouped is determined by the configured Handling Group's Mix Rule.
For example, a group configured as Mix with selected can share a Package with Ungrouped Items only when you include Ungrouped in its selected compatibility list. A group configured as Separate cannot share a Package with Ungrouped Items.
Understand Bilateral Compatibility
Between two configured Handling Groups, compatibility is bilateral. Both groups must permit the relationship before their Items can share a Package.
If Fragile uses Mix with selected and permits Cold, but Cold uses Separate, the two groups remain incompatible because Cold does not permit the relationship.
When the two configurations disagree, the more restrictive rule wins.
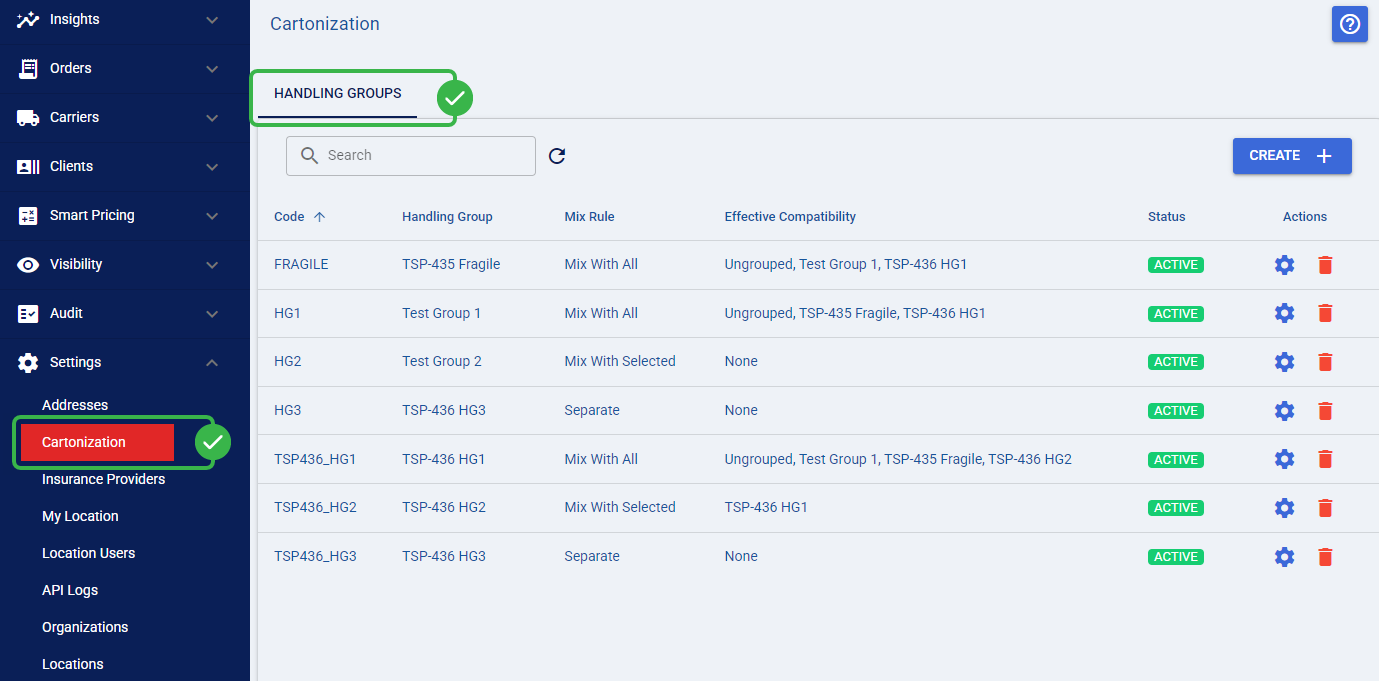
The Effective Compatibility value in Settings > Cartonization > Handling Groups shows the compatibility that actually applies after the relevant rules are evaluated.
| Separate applies at the Handling Group level, not to each individual Item. Multiple Items assigned to the same Separate group can still share a Package when they satisfy the normal physical packing requirements. | |
| | ||
Understand the All-Ungrouped Baseline
If you have no Handling Groups configured and all applicable Items remain Ungrouped, Cartonization preserves the established packing behavior.
You therefore do not need to assign every Item to a Handling Group. Use Handling Groups only when you need compatibility restrictions in addition to the normal physical Cartonization rules.
Determine Which Handling Group Applies
A Handling Group can come from the Item master, an Order Management Rule (OMR), an incoming order-line value, or a supported manual order-line edit.
When no Client override changes the normal resolution, the verified assignment precedence is:
- An incoming nonblank Handling Group value supplied with the order takes precedence.
- An OMR Handling Group assignment takes precedence over the Item-master value when no higher-precedence incoming value applies.
- The Item-master Handling Group acts as the baseline when no higher-precedence assignment applies.
For API-based Cartonization, Client settings can change how the Item-master Handling Group participates in the resolution. If you expect Cartonization to use Item data stored in techSHIP when the incoming line does not provide a Handling Group, make sure API Cartonization Join With Items is enabled for the Client. Override WMS Cartonization Handling Group changes source precedence: when this setting is enabled, the Handling Group stored on the Item master is used instead of a nonblank incoming Handling Group value. When the override is not enabled, a nonblank incoming Handling Group remains higher precedence.
| If an order line is unexpectedly Ungrouped even though the Item has a Handling Group, verify API Cartonization Join With Items and review Override WMS Cartonization Handling Group under the Client Details tab before troubleshooting the Handling Group configuration itself. | |
| | ||
If an OMR assigns a Handling Group, the assignment affects the targeted order line without rewriting the Handling Group stored on the Item master. For a practical configuration example, refer to Setting up Order Management Rules: Assigning Handling Groups for Cartonization [Guide].
You can also edit the Handling Group on a supported order line when your permissions allow it. Saving the line stores the changed assignment, but saving that value does not automatically repack the order.
| When multiple assignment sources may apply, review the Handling Group stored on the resulting order line before relying on the expected compatibility behavior. | |
| | ||
Understand Cartonization Exceptions
Ship In Own Packaging
When Ship In Own Packaging applies to an Item, techSHIP handles that Item through its own-packaging workflow instead of normal Handling Group packing.
A Separate Handling Group is different from Ship In Own Packaging. Separate prevents the group from sharing a Package with other compatibility groups, while Items within that same Separate group can still pack together.
For configuration details, refer to How to Ship Items in Their Own Packaging [Step-by-Step Guide].
Exclude From Cartonization
When you select Exclude From Cartonization in the Item editor, the Handling Group control is hidden because the Handling Group does not apply while the exclusion is selected.
 | Exclude From Cartonization affects Handling Group partitioning at the shipment level. If any shipment line has Exclude From Cartonization enabled, that shipment bypasses Handling Group partitioning. | |
| | ||
Because this behavior applies beyond the individual excluded Item, review all exclusion settings when a shipment does not separate according to its Handling Group compatibility rules.
Box Tags and Physical Fit
Handling Group compatibility and Box eligibility are separate constraints. Items that are allowed to mix still need an eligible Box that satisfies their dimensions, weight, utilization, and other applicable packing requirements.
When Box Tags are used as a Cartonization constraint, they narrow the Boxes available for the run. Box Tags do not override Handling Group compatibility; both constraints must be satisfied.
The selected Cartonization algorithm can affect the resulting Box selection, but the supported algorithms enforce the same Handling Group compatibility requirement.
| For algorithm-specific information, refer to Understanding Cartonization Algorithms [Information]. For more information on how Box Tags and Cartonization are related, see Setting up Order Management Rules: Cartonization by Box Tag [Guide]. | |
| | ||
Understand Handling Group Lifecycle and Imports
A group created in one Location is not automatically available in another, and techSHIP does not pre-create default Handling Groups for you.
Only active Handling Groups are available for new assignments. If you deactivate a group, its existing references and Item assignments can remain stored, but the inactive group is unavailable for new selections.
Inactive Handling Groups are also excluded from Effective Compatibility calculations while they remain inactive.
| An existing inactive Handling Group assignment can remain stored, but an inactive Handling Group cannot be used successfully for a new Cartonization operation. If Cartonization resolves an inactive group, you must reactivate the group or change the assignment. | |
| | ||
A Handling Group that is assigned to one or more Client Items cannot be deleted. You must first remove those Item assignments, or you can deactivate the group instead.
When deletion is allowed, the Handling Group is permanently removed, and its code is also removed from the selected compatibility lists of other Handling Groups.
For Item imports, a nonblank Handling Group code must identify an existing active group in the applicable Location. An unknown or inactive code causes validation to fail instead of creating a new Handling Group automatically.
During a supported replacement import, a present-but-blank Handling Group value clears the existing assignment and leaves the Item Ungrouped.
| During a replacement import, leave the Handling Group value blank only when you intend to clear the existing assignment. | |
| | ||
For workbook preparation and the supported import procedure, refer to How to Import Items for a Client from an XLSX File [Step-by-Step Guide].
Follow the Recommended Setup Sequence
Use the following setup sequence when preparing Cartonization with Handling Groups:
 | Configure your Boxes with the dimensions, weight limits, minimum allocation values, and other Cartonization settings required for your packing operation. For the complete procedure, see How to add Predefined Box types to a Client [Step-by-step guide]. |
 | Create the required Handling Groups and configure their Mix Rules. For the complete procedure, refer to How to Manage Handling Groups for Cartonization [Step-by-Step Guide]. |
 | Assign Handling Groups only to the Items that require compatibility rules. Leave Items Ungrouped when they do not require a specific Handling Group. For manual assignment, refer to How to Manually Set Up Items for a Client [Step-by-Step Guide]. For file-based assignment, refer to How to Import Items for a Client from an XLSX File [Step-by-Step Guide]. |
 | Optionally, configure an OMR when you need to assign or clear Handling Groups dynamically at the order-line level. For the supported use case, refer to Setting up Order Management Rules: Assigning Handling Groups for Cartonization [Guide]. |
 | Configure Cartonization for the Client or for an individual import as detailed below, then process the order and review the resulting Packages and Handling Group values. |
After completing this sequence, your Cartonization workflow is ready to apply both physical packing rules and Handling Group compatibility. You can next configure the default Client behavior or apply Cartonization to an individual import.
Configure Default Cartonization for a Client
Use this configuration when you want Cartonization to apply by default to orders imported for a specific Client.
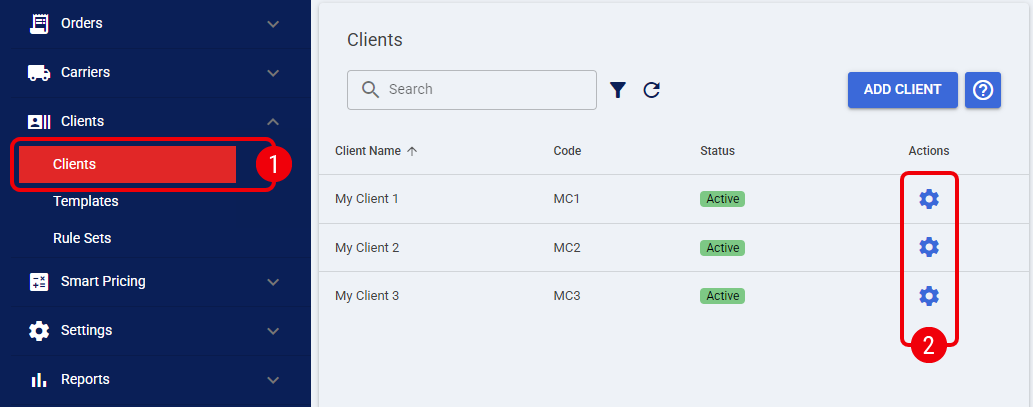
| Find the desired client by clicking on Clients from the left menu under the Clients section. |
| Edit the desired client by clicking the Settings button. |
| Click the Details tab. |
| Select Cartonization from Import Mode. |
| Select the required option from Cartonization algorithm. |
For information about the available algorithms, refer to Understanding Cartonization Algorithms [Information].
 | Click Save. |
| For an API-based Cartonization workflow, select API Cartonization Join With Items when you expect Cartonization to use Item data stored in techSHIP. Select Override WMS Cartonization Handling Group only when you want the Item-master Handling Group to take precedence over a nonblank incoming Handling Group value, and then click Save . | |
| | ||
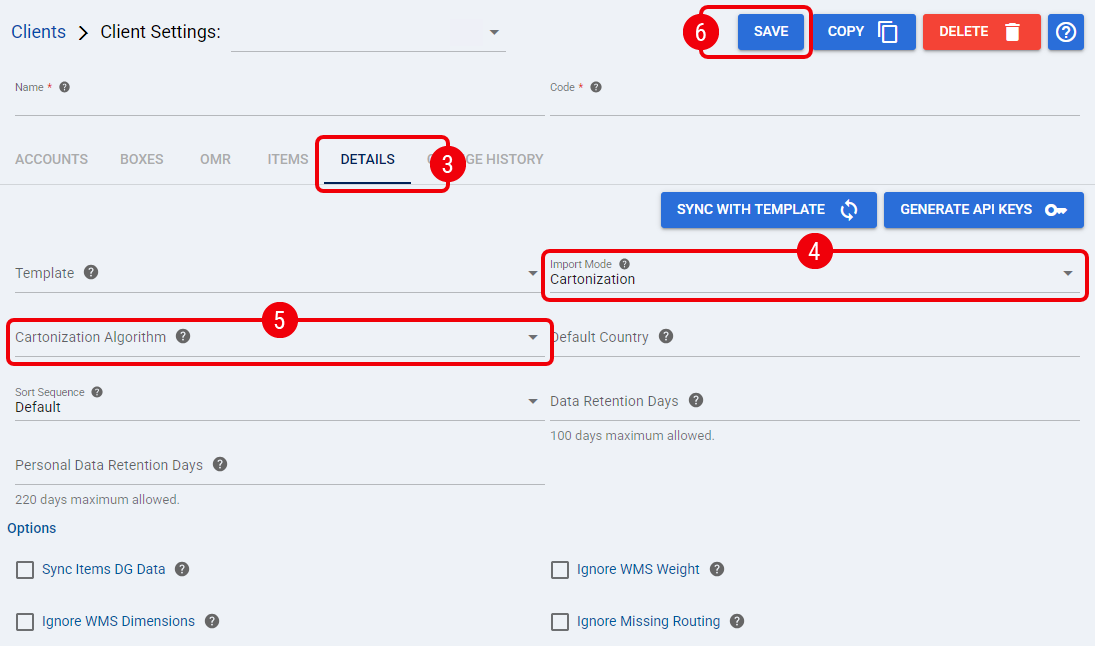
Your Client now uses Cartonization as its default Carton Import Mode. You can next configure the Cartonization Packing Slip or process an order and review the result.
Configure Cartonization for an Individual Import
Use this option when you want to apply Cartonization only to the order you are currently importing instead of changing the Client's default behavior.
| Click My Orders from the left menu under the Orders section. |
| Click Import. |

| Select Cartonization from Carton Mode. |
| Click Import to continue processing the order through the normal import workflow, as described in 01 - Importing orders and processing them - [Step-by-step guide]. |
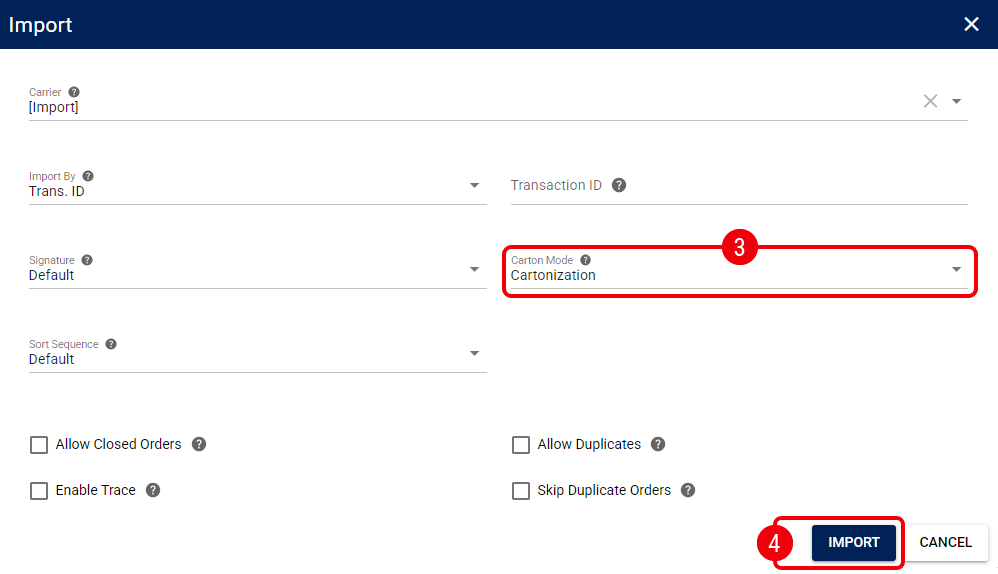
Once the import completes, Cartonization applies to that import only. You can next open the resulting order and review its Packages and Handling Group assignments.
Configure the Cartonization Packing Slip
Configure the Cartonization Packing Slip when you want your packing workflow to identify the Box type and Items assigned to each Package.
| Click Clients from the left menu under the Clients section. |
| Click the Edit icon for the desired Client. |
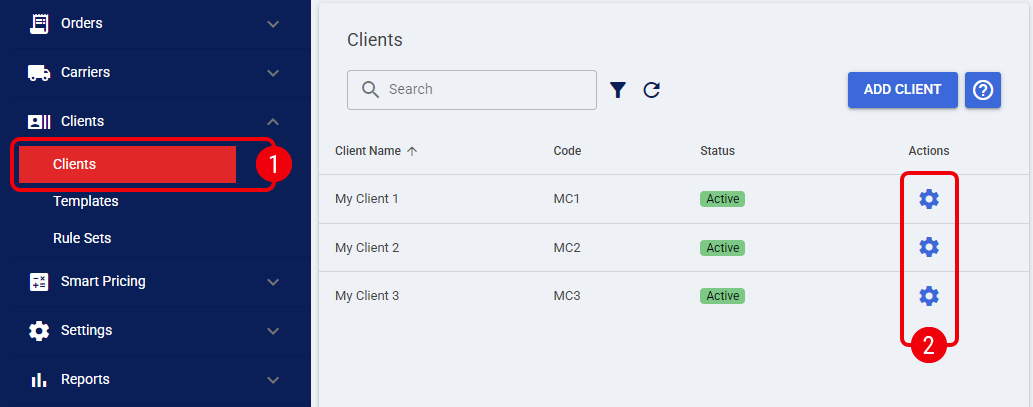
| Click Edit for the targeted Account. |
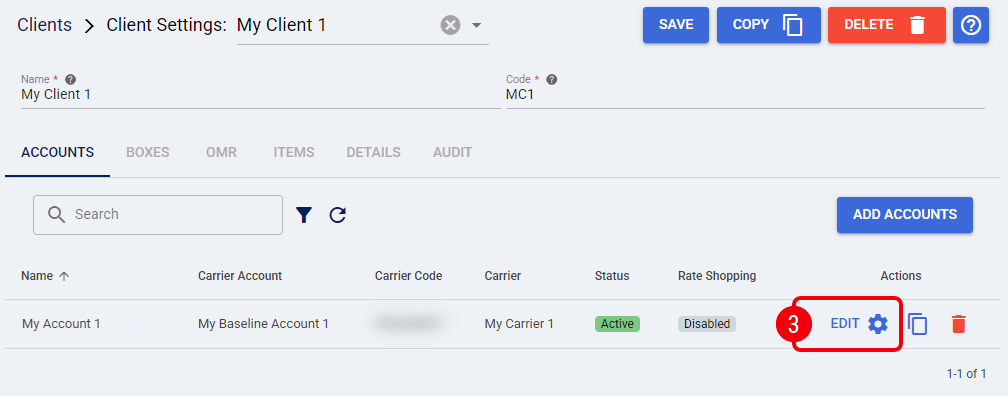
| Click Packing Slips. |
| Check Include and select General - Packing w/carton from the Type dropdown. |
| Click Save. |
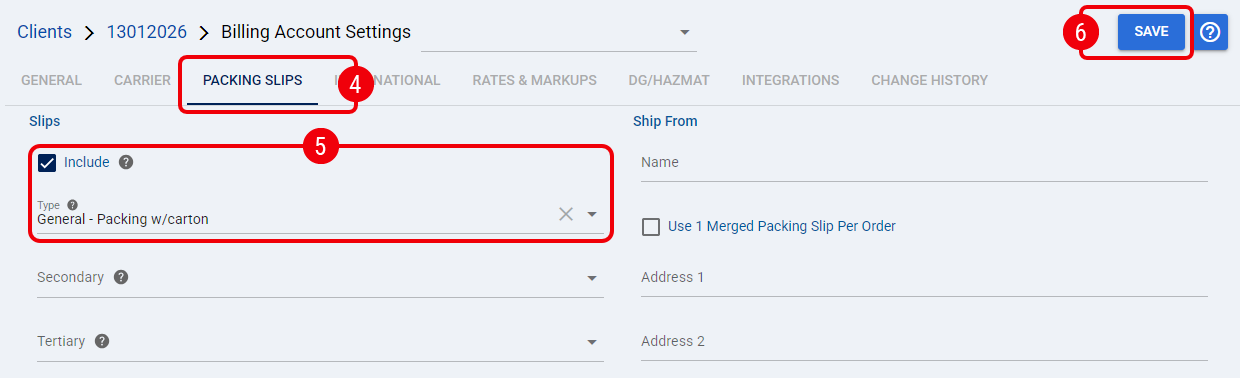
The account is now configured to use the Cartonization Packing Slip in the supported packing workflow. You can next process a cartonized order and use the resulting packing information during fulfillment.
Run Cartonization and Review Results
After Cartonization runs, review the result to confirm that the generated Packages and Handling Group assignments match your intended configuration.
| Process the order through a Cartonization-enabled workflow, either by using the Client's saved Cartonization configuration or by selecting Cartonization for the current import. |
| Open the resulting order and review its Packages, including the Items and quantities contained in each Package. |
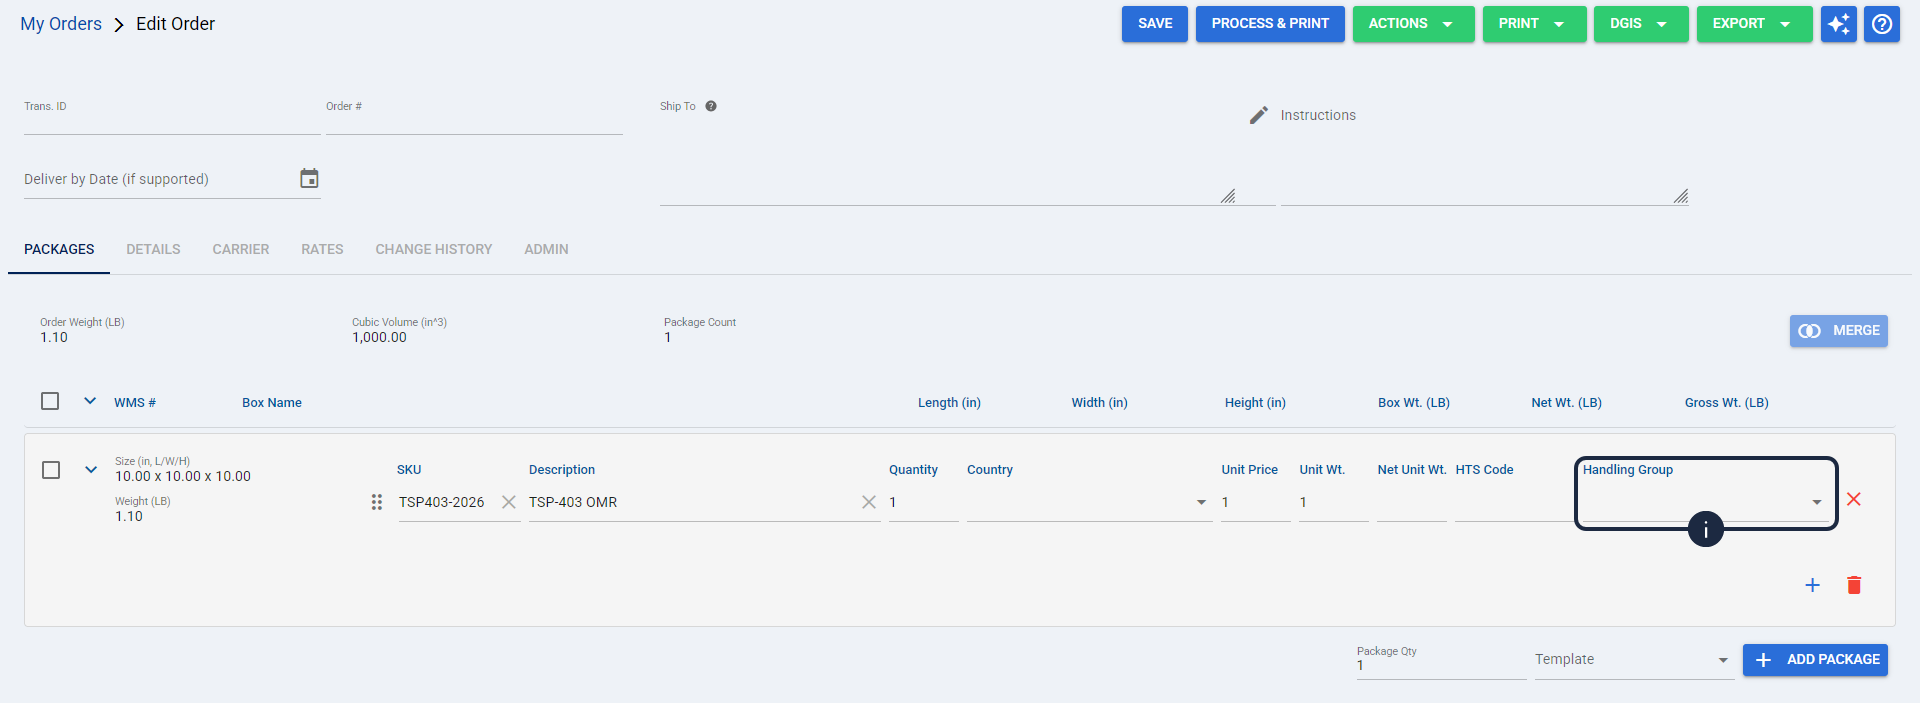
| Review the Item lines and confirm the Handling Group shown for each applicable line. |
| Handling Group belongs to the Item or order line. Do not expect a separate Package-level Handling Group field. | |
| | ||
| If you need to change an editable line, select the required Handling Group or clear the value to leave the line Ungrouped, click Save, then reopen the line and verify that the saved value is retained. |
| If you need the Package composition to reflect the changed assignment, run Cartonization again through your supported workflow because saving the line does not automatically repack the order. |
You have now verified both the generated Package contents and the effective Handling Group assignments. If the result is unexpected, use the troubleshooting guidance below.