

When setting up your Clients in techShip, you will have to configure Billing Accounts to ship through them. These use a Baseline Account as a foundation, but their way to work could be different based on the Client's needs.
When setting Billing Accounts, you will be able to specify how it should work for that specific client, setting label references, packing slips usage, rate shopping, markups, WMS information updating and Carrier options such as the default service level, address validation, sender and return addresses, etc.
This article describes the procedure to set up a Manitoulin billing account, while others are specifically written for other Carriers.
To set up a Manitoulin billing account, define the following and then Save:
ADD THE ACCOUNT TO THE CLIENT PROFILE
1. Access Clients under the Maintenance menu

2. Click on the Client for which you wish to set up the billing account
3. Press Add Billing Account
4. Select the source account which will be used and Save

5. Edit the Billing account
SET UP THE GENERAL OPTIONS
The General Options tab is the same for every carrier. If you are already acquainted with it from previous setups, please configure it accordingly.
If this is your first time setup or you aren't acquainted to it, refer to the following article and once finished, return to this one to set up the carrier specific options:
How to configure the Billing Account General Options tab [Step-by-Step guide]
SET UP THE CARRIER OPTIONS
The Carrier Options tab allows to set up basic and advanced features of your Manitoulin billing account.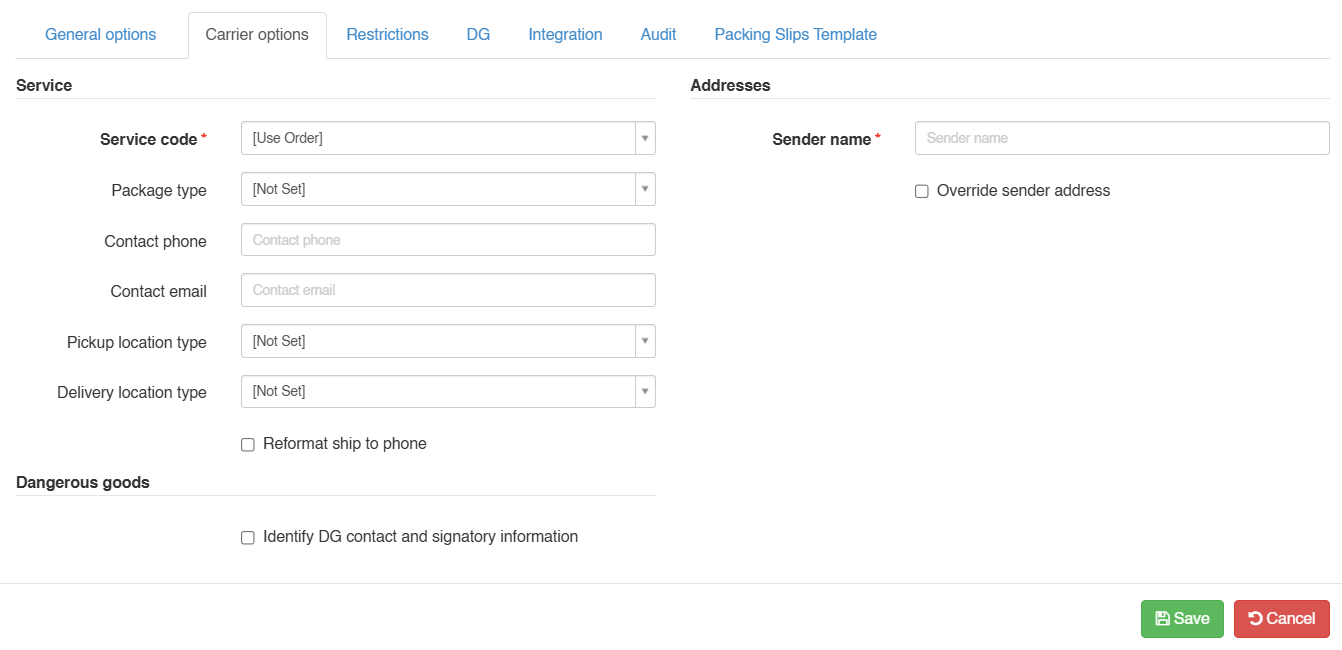
These are the key elements:
A) Service code: Choose a service code to assign to imported orders which don’t have a service code or keep it if they have.
B) Package type: Specify the value from the list, which will be the package type stated as used to the carrier (Pallet, box, etc).
C) Sender name: Specify the sender name. You can also override the sender address (by default techShip will use the one defined on the source Carrier account) to an address different from the source. To do so, follow the steps from this article.
DANGEROUS GOODS
For Dangerous Goods shipments, complete the contact and declaration information in the Dangerous goods section of the Carrier options tab.
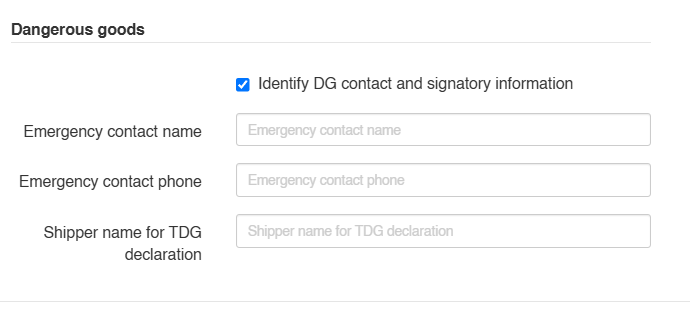
Identify DG contact and signatory information: Enable this option to display and complete the following fields for Dangerous Goods shipments.
Emergency contact name: Enter the emergency contact's name. Required for Dangerous Goods shipments.
Emergency contact phone: Enter the emergency contact's phone number. Required for Dangerous Goods shipments.
Shipper name for TDG declaration: Enter the name of the shipper responsible for the Transportation of Dangerous Goods declaration. Required for Dangerous Goods shipments; limited to 45 alphanumeric characters.
Press Save to apply the changes.
 NOTE: The Identify DG contact and signatory information option configures the contact and declaration details only. To process a Dangerous Goods shipment, also enable Dangerous goods on the Order's Carrier tab and ensure the shipment lines are linked to client items with the appropriate Dangerous Goods details configured.
 WARNING: Manitoulin supports only one Dangerous Goods definition per package. DG and non-DG items can share a package, but all DG items within that package must have matching DG properties. Items with different DG definitions must be placed in separate packages.
NOTE: Manitoulin requires Dangerous Goods shipments to be reported in KG. For Class 1 explosives, the net explosive quantity must represent the total net explosive mass in the shipment. techSHIP calculates this total using the configured DG quantity and the shipped line-item quantity.
SPECIFYING RATE SHOPPING SERVICE CODES (OPTIONAL)
If you are Rate Shopping with this account, you might want to specify which services you want be taken into consideration or excluded. Read this article to set up your inclusion/exclusion list.