The Order Management Rules (OMR) engine for Rule Sets has been fully rebuilt in techSHIP, enabling you to visually build more complex logic with improved flexibility and clarity.
This guide highlights the key UI changes introduced in OMRv2.
 | This article focuses exclusively on Rule Set OMRs. Client-level and Client Template-level OMRs remain unchanged. OMRv1 and OMRv2 refer to the previous and new versions, respectively. | |
| | ||
| To learn about the OMRv1 logic, refer to How to Set Up Portal Global OMR Rules [Step-by-Step Guide]. While the article is based on the previous OMR engine, it remains a valid reference until the updated version is published. | |
| | ||
The following video offers a quick tour of the key OMRv2 features covered in this article:
Prefer listening? This podcast-style audio walks you through the article's key points.
| AI-Assisted & Human-Reviewed: For general information only. Please double-check important details. | |
| | ||
| |
For a full overview of all new features, see: What's New in techSHIP: A Guide to the Latest Features [Information].
|
TABLE OF CONTENTS
- OMR v1 vs. v2
- Trigger
- Visual Rule Builder
- AI Assistant (Beta)
- Import and Export
- Clients
- Snapshots and Version History
OMR v1 vs. v2
Conversion Process
Each location can be accessed through either the previous or the new interface. Thus, both OMRv1 and OMRv2 rules are visible in both interfaces, but each rule can only be managed in a single version:
- OMRv1 rules can only be edited in techSHIP Legacy, and appear in techSHIP with a conversion icon.
- OMRv2 rules can only be edited in techSHIP, and appear in techSHIP Legacy with a link to techSHIP.
VERSION | TECHSHIP LEGACY | TECHSHIP |
OMRv1 |  |  |
OMRv2 |  |  |
 | Converting an OMRv1 to OMRv2 cannot be undone. | |
| | ||

Structural Changes
OMRv2 introduces several structural enhancements that increase automation flexibility:
- For Each Loops: This new block impacts how Conditions and Actionsare evaluated:
- Steps placed outside a loop operate strictly at the Order level.
- Steps placed inside a loop gain access to granular, iteration-specific data, enabling more precise validation and transformations.
Refer to the For Each Loops section for details on data-level availability.
- Package Level: This new data level enables validation and modification of individual package attributes. It was not available in OMRv1.
- Line-Level Evaluation: In OMRv1, line-level conditions triggered when any line matched. In OMRv2, line-level logic must be executed within a For Each Loop, giving you explicit control over whether to process specific lines, related packages, or the entire order.
Trigger
In OMRv1, each rule could be triggered by a different event. In OMRv2, the entire rule set is triggered by a single event, defined in the rule set's main properties via the Trigger drop-down.
Select one of the following options to determine when the rule executes:
- Import: Triggers when the order is imported into techSHIP.
- Process: Triggers when the order is processed.
- Carrier Selected: Triggers when a specific carrier is assigned. Selecting this option displays the Carrier Code drop-down to specify the exact carrier.
- Before Create Label: Triggers after the system completes rate shopping and selects the optimal rate, but before the shipment label is generated. This allows you to evaluate shipping costs for Rate Shop and Eco orders before committing to the label.
| Once you save the rule set, you cannot change the selected Trigger or Carrier Code. To change these values, you must create a new rule set. | |
| | ||
| For the Before Create Label trigger, if a carrier is explicitly selected on the order prior to processing, the rule will still execute, but it skips the rate shop evaluation phase. | |
| | ||

Visual Rule Builder
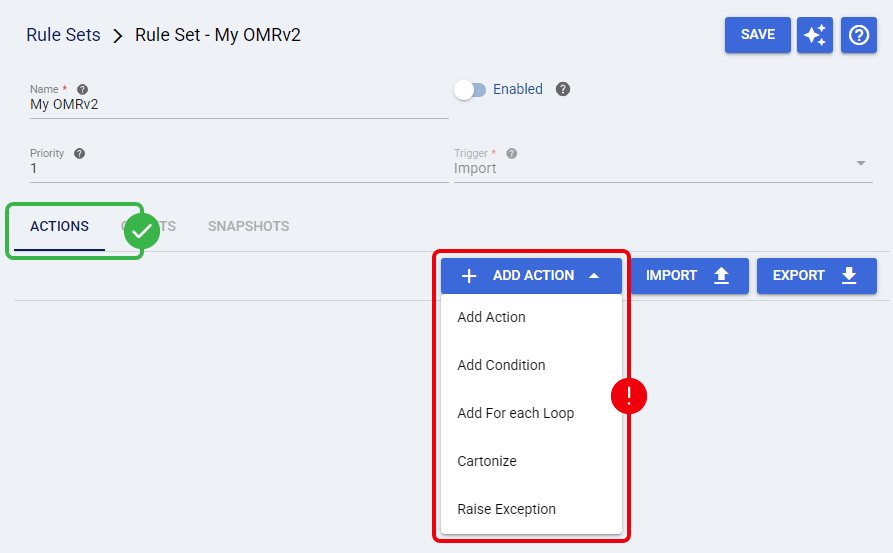
From the Actions tab, you can manually build the rule logic using the Add Action button to add steps (such as Actions, Conditions, For Each Loops, etc.) Together, these steps visually assemble into a Decision Tree.
OMRv2 introduces a modular, atomic structure for all its building blocks. Each step operates independently and defines its own properties.
| The Decision Tree is built step-by-step, following the logic flow you define. For best results, we recommend outlining your rule structure in advance. | |
| | ||
Conditions
Conditions in OMRv2 are structured as logic trees, allowing you to visually build complex evaluation paths.
- Logic Trees: Operands are grouped under logic operators (AND, OR, NOT).
- Mixed Logic: Each operand defines its own properties.
- Scoped Data: The fields available depend on the loop level (Order, Package, or Line).
| For more information, refer to the For Each Loops subsection. | |
| | ||

When validating Package attributes outside of a loop (at the Order level), techSHIP automatically applies group operators to evaluate all packages collectively:
- All in: All packages must match the criteria.
- At least one in: At least one package must match.
- All not in: No packages should match.
| You can use expressions for advanced logic. Refer to Using Custom Variables and Expressions in OMR [Information] to ensure you are using the correct syntax depending on the applied scope. | |
| | ||
For example, you could create a condition that checks whether:
- the total order quantity is 10, and
- the Ship-To country is US.

Actions
OMRv2 follows the same atomic logic for Actions. Each action defines its own properties and scope, determined by its placement relative to For Each Loops.

| If the value you need to assign is not listed in the Field dropdown (e.g., a specific custom field), check Use Expression. For syntax details, see Using Custom Variables and Expressions in OMR [Information]. | |
| | ||
For Each Loops
OMRv2 introduces For Each Loops, which allow you to iterate through the order's structure (Packages or Lines) to apply logic to specific items. When adding a loop, you must select the iteration Level to determine its scope:
LOOP LEVEL | ORDER | PACKAGE | LINE | BEST FOR... |
Package Loop |  |  | Validating dimensions, weights, or applying package-specific declared values. | |
Line Loop |  |  |  | Checking SKU flags (e.g., Dangerous Goods) or updating line-item instructions. |
Inside a loop, nested conditions are evaluated individually for the specific package or line being processed.
| When branching inside a loop, avoid applying order-level Actions to the same field on both the True and False paths. Because the loop iterates through every item, the field's final value will be overwritten by the result of the last item evaluated. | |
| | ||

Additionally, you can add an Exit Loop action within a For Each Loop block to immediately stop its execution and skip any remaining steps in that block. Execution then continues with the next steps outside the loop. This is useful, for example, when you've already found the specific line you were searching for and no longer need to process the rest.
| This action works like a break statement in programming. For detailed instructions on how to add this step, refer to the Decision Tree section. | |
| | ||

For example, if you need to perform an order-level Action when any SKU is flagged as a Dangerous Good (DG), place the condition that checks the SKU inside a For Each Loop:

Raise Exception
The Raise Exception action is a special step that immediately stops the rule set's execution. When triggered, this action logs a custom Message that you define and rolls back any changes made during that execution.

For example, imagine a rule that first applies a default Instruction (like "Add consumer gift receipt") to an order. Immediately after, a condition checks if the Order type is "Wholesale". If the condition is true (it is a "Wholesale" order), the Raise Exception action is triggered. This not only stops the rule but also rolls back the initial "Add consumer gift receipt" instruction, preventing the order from being updated with misleading data.

Cartonization
The Cartonize action applies one of techSHIP's cartonization algorithms to the order during the rule's execution. When you add this step, you must select the Algorithm to use.
| For the cartonization action to succeed, eligible Clients must have at least one predefined box in their settings. For instructions, see How to Add Predefined Box Types to a Client [Step-by-Step Guide]. | |
| | ||

Available options are:
 | Algorithm: Select the logic engine used to determine the most efficient box for an order. For detailed selection criteria, see: Understanding Cartonization Algorithms [Information]. |
 | Tags: Optionally, select the Tags used to restrict Box selection. Select multiple Tags to require all of them. Leave empty to evaluate all available Boxes. For advanced setup, see: Setting up Order Management Rules: Cartonization by Box Tag [Guide]. |
Decision Tree
As you add steps, a Decision Tree is formed. This visual representation helps you understand the rule's logic flow, cover edge cases, and quickly identify where additional steps should be placed.
- For Each Loops appear as yellow diamonds, with an arrow indicating the iterative flow of the block.
- Conditions appear as dark cyan trapezoids, with the left branch representing the True path and the right branch representing the False path.
- Remaining steps are color-coded based on their position in the tree:
- Green for those on the left (True) branch.
- Red for those on the right (False) branch.
- Blank for those not linked to a Condition.
- Raise Exception steps are preceded by a red circled cross icon.
- Exit Loop steps are preceded by a red circled stop-symbol icon.
The following example illustrates a complete Decision Tree that, for all orders:
- Halts the entire process if the Ship-To country is not U.S. or Canada (Raise Exception action located at the last False branch);
- sets signature required (order-level Action located at the end of the Decision Tree);
- applies cartonization (Cartonize action located at the end of the tree); and
- applies the corresponding terms, depending on the order's country (order-level Conditions) and,
- for Canada, if any line item (For Each Loop)
- is flagged as DG (line-level Condition), then
- applies the Canadian DG Terms (order-level Action),
- adds a "Handle with care" instruction to that line (line-level Action), and
- stops scanning the remaining order lines (Exit Loop action).

Click any Add icon to insert an additional step at that location.

| The menu will only display steps compatible with that specific location. For Each Loops cannot be nested inside themselves. Exit Loop actions are only available within a For Each Loop. | |
| | ||
| Both Raise Exception and Exit Loop actions are available within a For Each Loop block. Use Raise Exception to immediately stop the entire rule processing, and Exit Loop to break the loop but continue processing the rule. | |
| | ||
AI Assistant (Beta)
The new AI Assistant opens a chat panel that allows you to automatically generate, modify, or validate rule flows using natural language.
This feature significantly reduces the time required to build complex OMRs by translating your business requirements directly into the visual decision tree.
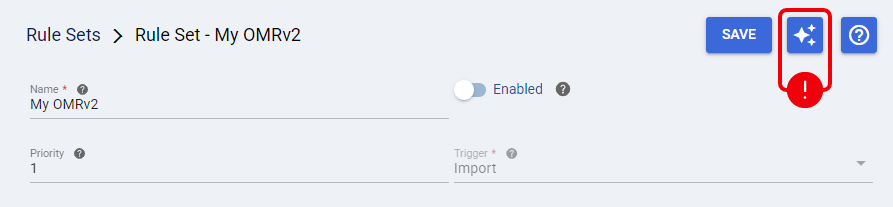
From the top-level action buttons, press AI Assistant (Beta) to access the panel.
Understanding the Chat Panel
The AI Assistant panel includes several tools to manage your session:
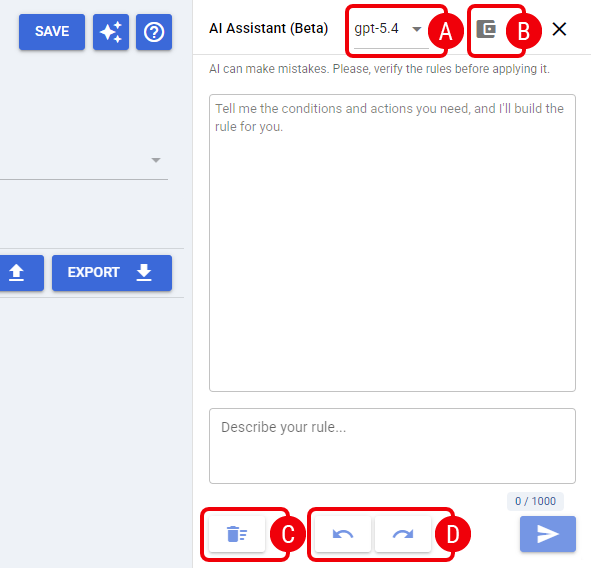
 | Model: Allows you to select the active AI model version. |
 | Wallet: Displays your current AI token usage and limit. |
| The assistant will be disabled automatically if your limit is exceeded. | |
| | ||
 | Clear Chat: Clears the current conversation and starts a new history record. |
 | Undo / Redo: Reverts or reapplies recent chat actions to the decision tree. |
Using the AI Assistant
You can interact with the AI Assistant conversationally to build or test your logic.
To build a rule from scratch or add a new condition, simply describe your requirement in plain English. For example:
- "If the order contains ice cream, add an instruction for 'Refrigerated'. If it is lactose-free or vegan, also add a temperature regime of -30."
- "Route all orders under 5 lb to UPS Ground."
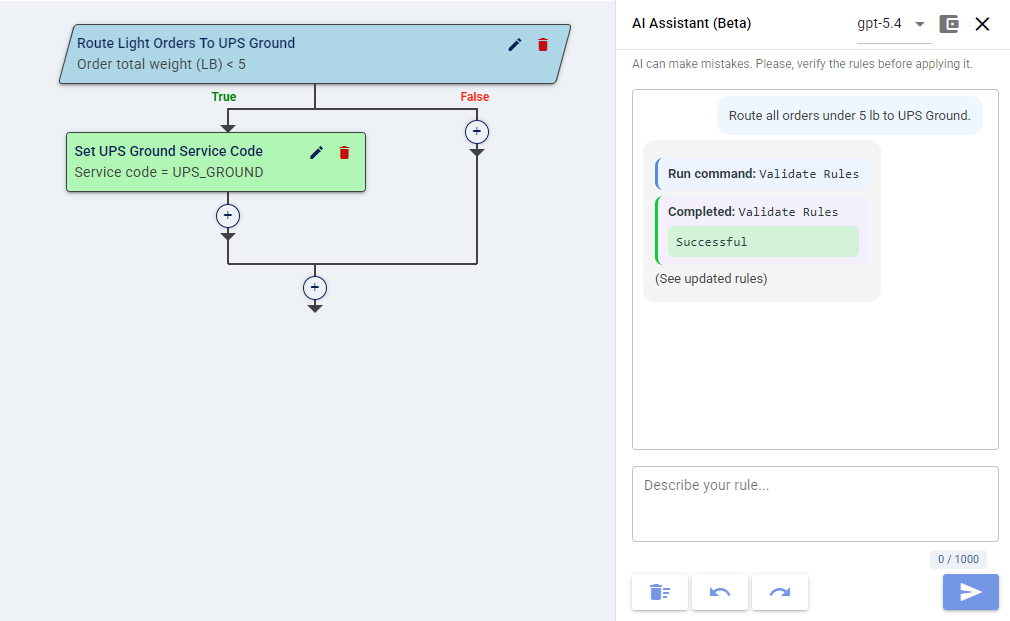
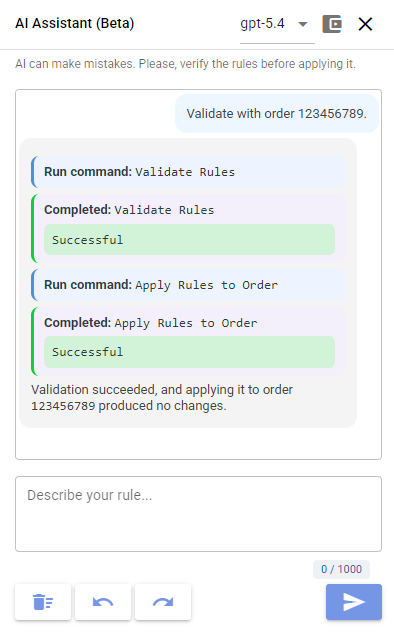
To test the logic tree against an existing order, provide its URL or ID. This ensures the rule behaves exactly as expected before saving. To achieve this, the assistant validates the rule in-memory, meaning it will show you the changeset without actually modifying the real order data. For example:
- "Validate with order 123456789."
- "Run this rule against 987654321 and show me the changeset."
| Always review the updated decision tree and validation results carefully before pressing Save. | |
| | ||
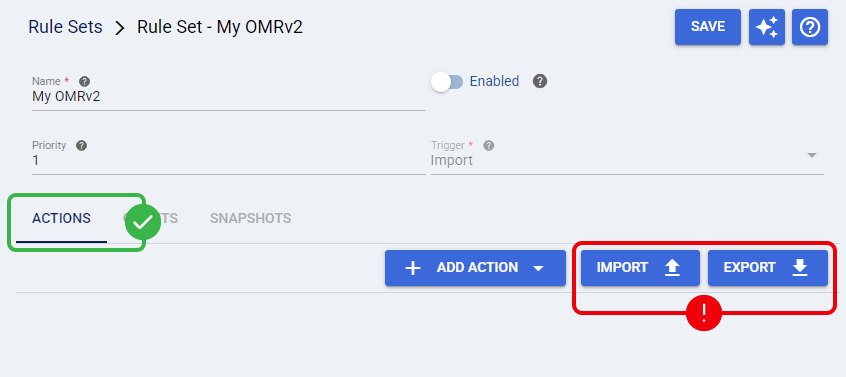
Import and Export
You can Import and Export OMRv2 rules from the Actions tab using the corresponding buttons.
Exported OMRv2 files use the YAML format, allowing you to edit them externally and re-import into any OMRv2 rule set.
| Importing a rule set automatically creates a new entry in the Snapshots tab. | |
| | ||
| Take into account that importing a file completely overwrites the current OMR. The import process does not validate rules for conflicts. Overlaps or contradictions may cause unexpected behavior. | |
| | ||
Exported OMRv1 files have limited compatibility. You can import them into OMRv2 using the Convert From OMRv1 Format option. During this process, only rules whose trigger matches the current rule set will be imported.
| If an OMRv1 file is listed and available for conversion, use the conversion process instead of a direct import. | |
| | ||

| If you import a complex rule and need help understanding its logic, you can open the AI Assistant (Beta) and ask it to explain what the current rules do.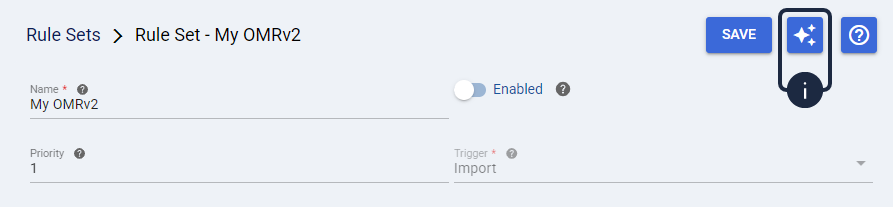 | |
| | ||
Clients
In OMRv2, assigned Clients are visually managed through the Clients tab, allowing for an easier overview and modification.
| If no Clients are assigned, the rule applies to all Clients within the current Location. | |
| | ||

Snapshots and Version History
Save Rule Set Dialog
When you Save an OMR, a brief Description of the changes is required. You can manually enter this description or press Generate to use AI to automatically analyze and summarize the modifications.

Snapshots Tab
A dedicated tab logs the version history of the rule set. Every time you Save, Import, or Restore, a new snapshot is recorded.

You can easily roll back to a previously saved state by clicking Restore. Reverting the logic automatically creates a new backup snapshot of the restored state, ensuring no history is lost.
